easiest butternut squash soup

Hello friends! Hope you all had a great weekend.  Mine went a little too quickly and wasn't all that productive, but I got some much needed downtime, which was nice. I mentioned in my last post that I would share a recipe for the soup that I made to go with my bread, so here it is!  I think that squash is quickly becoming one of my go-to foods.  It's so yummy and super easy to incorporate into meals. When I made this soup it was already 9:30pm (woops) and I was looking for something easy that I could make with what I had on hand.  I looked around at a few different recipes and then threw together my own simplified version...and amazingly it turned out great! Depending on how much you eat this recipe makes enough for 1-2 servings.

Ingredients:
1 tablespoon butter
Half an onion
1 clove of garlic
Half a butternut squash, cut into small cubes
3/4 cup stock (vegetable or chicken - whatever you prefer.  I used bouillon cubes to make mine)
1 cup milk or half and half (I used 2 percent milk)
1/8 teaspoon cinnamon
1/4 teaspoon cayenne pepper (less if you don't like it too spicy)
1/4 teaspoon dried sage
Salt and pepper to season

Heat the butter over medium heat in a saucepan.  Add the chopped onion and garlic.  Cook for around 5 minutes.  Add the spices and sage, stir for a minute or so.  Add the squash, stock, milk/half and half and a cup of water.  Let simmer for 15-20 minutes or until the squash is soft. Put in a blender and puree until smooth. I prefer a thick soup, but if it's too thick add a little more water as you blend.  Season with salt and pepper, and maybe a squirt of lemon juice.  Eat up!
One of my goals for this year was to start eating better and cooking real meals (rather than making pasta or heating up frozen food every night).  Problem is, it's a huge bummer trying to cook for one person and I really don't feel like I have that much more time to cook than I did before.  I'm trying to figure out meals that are healthy but still quick and easy to make in smaller portions...So hopefully I will be sharing more of these types of recipes on here!

rosemary wheat bread

Ever since my sophomore year  I've had the same bag of bread flour (guys, I'm graduated now...).  Every few months I would say that I was going to use it and my roommates would all laugh and go, "yeah right!".  Well, this weekend I finally made that bread and it was so good! (I may or may not have had to buy new flour because the bag I already had was expired, but let's not get caught up in the details).  In recent years I have made bread a few times while visiting home and I always love making it.  It takes a long time to make but it's really not that hard and it's a nice project to do when you just want a relaxed day at home. Also, it makes the house smell amazing.

This recipe is adapted from a simple whole wheat bread recipe from this book (see the original recipe here).  It's a really good jumping off point for experimenting with different flavors.  This time around I chose to add rosemary, which works really well with the subtle sweetness of the bread. 
First you will need to make a sponge, which I guess is also sometimes called a starter (more info here).

For the sponge you need:
3 cups warm water (105 to 115º)
1 cup dried buttermilk
2 tablespoons active dry yeast
3/4 cup honey
3 cups whole‐wheat flour

Mix together all of the ingredients until smooth.  The sponge should be thick but still liquidy (not doughy).  Cover with saran wrap and let rise in a warm place for an hour.  It should double in size.  Stir it carefully with a wooden spoon.
Once your sponge is ready you can begin adding the rest of the ingredients to make your dough.

You will need:
1/2 cup vegetable oil 
1‐1/4 tablespoons salt
2 tablespoons finely chopped fresh rosemary
2 to 2 1/2 cups whole-wheat bread flour
3 cups white bread flour

Sprinkle the oil, salt, rosemary and 2 cups of the flour over the sponge and beat hard until smooth.  Add the remaining flour 1/2 cup at a time with a wooden spoon until a soft dough is formed that just clears the sides of the bowl. NOTE: The original recipe uses all wheat flour but I prefer using almost half wheat and half white.  You may not need to use all of the flour so alternate between white and wheat flours. Next, begin kneading the dough on a lightly floured surface. Be careful not to add too much flour as you go because the dough should remain a little bit sticky. Place in an oiled bowl, turn once to coat the top, and cover with saran wrap.  Let rise in a warm place until doubled in size, about 1‐1/2 to 2 hours.
  
Next, divide the dough into 3 equal portions.  Shape into 3 round balls and place them at least 4 inches apart on an oiled or parchment‐lined baking sheet that has been sprinkled with rolled oats or corn meal (I like cornmeal because it gives it a little crunch).  Cover loosely with saran wrap and let rise for about 45 minutes (or what I did was refrigerated over night and then took it out for a bit the next morning before baking it). When the dough is almost ready to be baked, preheat the oven to 375º.

Before you put the dough into the oven you want to very gently (so you don't deflate them) brush the tops of the loaves with a generous coat of rosemary infused oil. Then sprinkle with large grain sea salt (be generous with this too--it's the best part!).  To make rosemary infused olive oil, put 1 cup of olive oil and around 5 sprigs of fresh rosemary in a small saucepan.  Heat over medium heat for around 5 minutes.  Let it cool a bit and put it into a small container with the rosemary.  This should last in the refrigerator for about a month.
  
Bake your loaves in the center of the oven for about 40 to 45 minutes, or until the loaves are
deep brown and hollow sounding when tapped.  The author recommends putting aluminum foil over the tops to control browning, and I would definitely suggest doing this.  Also, keep an eye on your bread and make adjustments as necessary, especially if this is your first time baking bread or if you have a finicky oven.  My oven is a bit hard to control so I had some trouble getting my bread to bake evenly (also, one shelve collapsed and a loaf fell to the floor and deflated...ugh).  When your bread is done, enjoy as much of it as possible while fresh and warm! I would highly recommend eating this with some sort of squash soup (later this week I will share a simple recipe that I used).  Happy baking!

happy valentine's day!

Happy (late) Valentine's day!  I hope your day was great.  My day was filled with extra cuddles from my little Valentines at work (I work at a pre school), lots of chocolate, and some face-timing with Taylor.  I wasn't going to but Taylor insisted that I post this little (corny and slightly embarrassing) Valentine's day video that I made for him since we were far apart this year.  Sometime I'll share a bit about how I made it!


easy valentine's day gifts

Usually I spend a lot of time making personalized Valentine's day cards for all of my close friends...but this year I'm a little carded-out so I decided to try something else.  Here are a couple of easy projects that I've done that I hope will inspire you! 
My friends and I are a little bit tea-obsessed--we spend so much time at a local tea house that they all know us (and how we like our tea), and some of us may have tea hoarding problems.  So, I thought something tea related would be perfect.  This project can be a little bit meticulous/time consuming if you don't have a sewing machine, but it's easy enough that you could post yourself in front of the TV tomorrow night and finish them in time for Thursday.  Here's what you need for this project: Coffee filters, embroidery thread, a thick needle, card stock, a pen, scissors, and loose leaf tea (you can also always cut open tea bags and take the tea out).
 Steps // 1: Cut heart shapes out of your coffee filters // 2: Line them up and carefully sew the edges with your embroidery thread (or, if you're lucky, complete this step with a sewing machine and some colored thread) // 3: Before you close up the heart, fill the bag with loose leaf tea // 4:  Thread a short piece of embroidery thread through the top of your tea bag.  Thread the opposite end through your tag, which you will make out of card stock // 5: Write a sweet message to your Valentine on one side of your tag and write the type of tea in the bag on the other side // 6:  Put the tea bags in a pretty bag or tin (see this tutorial for some ideas) and give them to your friends to enjoy!
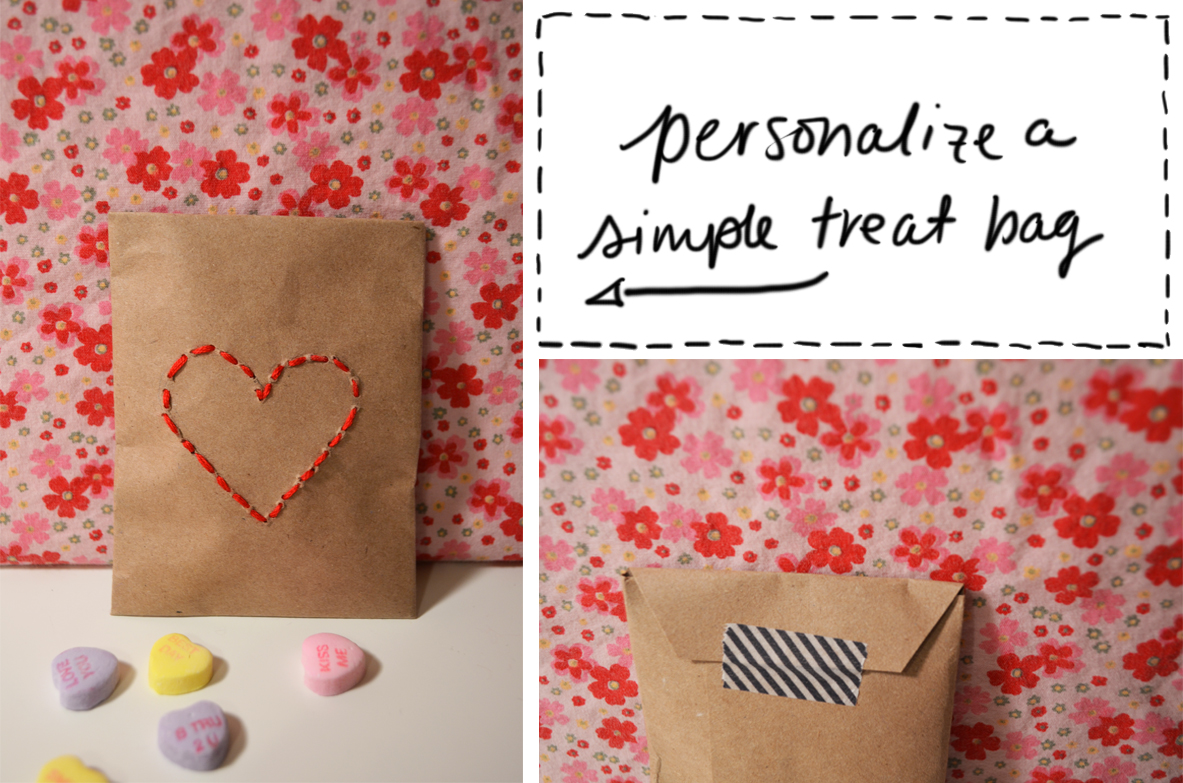
Another super easy idea is to use embroidery thread to decorate a craft paper bag filled with treats.  Here is a tutorial for making these little baggies. I just filled this one with conversation hearts, but if you have more time you could fill it with these home-made heart gum drops, or you could make a larger bag and give your Valentines delicious heart-shaped baked goods, like these Nutella treats.
Two years ago my roommate and I made a bunch of pink cupcakes and put these little heart labels on them for our friends.  This is a great idea if you have a lot of people that you want to give something to, but don't have much time.  Just cut out heart shapes, write names/messages on them, glue two heart pieces together with a toothpick between them, and stick them in your cupcakes! (credit for this picture goes to my lovely housemate Caroline).

What are you making for your Valentines this year?

valentine's day outfit inspiration

I love Valentine's Day for many reasons...First and foremost, it gives you an opportunity to slow down and show those you love how much you care (the way we really should everyday, yet often forget to)...and reminds you of the people you have in your life to be thankful for.  Less importantly, Valentine's day is an excuse to do lots of fun crafting, make sweets, and get all dressed up to go out on a romantic date, a girl's night out with your single friends, or just stay in (I like to get dressed up either way!).  With Taylor gone in France this year my Valentine's day will most likely consist of a Skype date in my pjs, but I thought it would be fun to share what I would wear if he was here to go out on the town with for dinner.
This romantic red lace dress from Free People is the perfect Valentine's day dress.  I would pair it with heart tights, comfy black bootiesgold accessories...oh, and my black pea coat...'cause it's freezing here right now.  

Sometime in the next few days I'll share some quick ideas for Valentine gifts for friends that I'm working on.  They will be pretty simple, so make sure to check back if you're strapped for time!

I love planners

It's weird, but I really do love planners. Buying a new planner, notebooks and post-it notes is definitely my favorite part of starting a new year. Problem is, despite my love for office/organizational supplies, I am not really an organized person.  I've always been a list maker, but I write so many lists in so many places that I can't keep track of them.  It's a problem.  So, this year one of my resolutions was to be more organized.  So far it's going pretty well!  I decided that to help with this I would put together a planner that has everything I need in it, so I will actually use it.
To make my planner I got a mini binder from Russell + Hazel.  They sell everything you need to fill the binder, but it's pretty expensive so I chose to just get the weekly planner inserts and then make everything else myself.  You could also make your own inserts using tables in Word or you could try and find a template online (I was going to do this but didn't have a printer).  You can also find mini binders at most office supply stores if the Russel + Hazel ones are too pricey.  I got some white card stock and cut it to make the dividers and used washi tape to cover the tabs.  I also use thin washi tape to mark really important events that are coming up.
I also used the card stock to make other sections that I thought would help keep me organized.  I made a section with a list of short phrases that remind me of my new years resolutions, and a page for planning meals/grocery shopping lists (by doing this I have been pretty successful at avoiding a fridge full of rotting food at the end of each week).
To keep me on track with this blog I made a section for writing down blog post ideas, and planning out my blog posts for the next two weeks.  I just made a page (that folds out) with squares that fit little post-it notes.  This allows me to rearrange the schedule if I need to.  I also put in some extra pieces of lined paper for taking notes, and a space for keeping track of all the little tasks that I need to get done, but that aren't urgent. In the years to come I can add new sections, depending on my needs.  Yay for getting organized!

Wire Quote DIY

Here's a quick little project I did last night that was inspired by one of the pictures I used in my inspiration board last week.  All you need for this project is a spool of 18 gauge wire.  Depending on your project you might want to go with even thicker wire, but I wouldn't go any thinner.  I got the next size down and it didn't hold its shape super well.  I originally wanted black wire, but couldn't find any. Eventually I might try painting it, but I like how the silver looks for now (unfortunately, it doesn't photograph too well...sorry!).  Gold would look great against a white wall.
Just find a short phrase that you like and shape the wire into letters with your hands.  My phrase was inspired by a quote from Thornton Wilder.  “We can only be said to be alive in those moments when our hearts are conscious of our treasures.” It will be a nice reminder to have in a place where I look every morning while getting ready.  I attached mine to the wall with some scotch tape (the matte kind, so the light doesn't make it show) and it's not noticeable at all.  If I wasn't renting I would probably just hang it from a few of those sewing pins that don't have the balls on the ends (this kind).